How to: Mapping + Caltopo
Why Map?
The most committing forms of climbing or mountain sports are often the ones that take you deep into the backcountry. Along with this commitment come the questions, “Which way do I go?” and, “How will I keep from getting lost?”. Sure you may have a route topo for the ridge you want to climb, but what about getting to the base of it? Or the walk-off the other side of the peak? Or maybe you just spotted a sweet ski line from last week’s tour, and now you want to find your way out there. For any of these scenarios a good map is the best way to stay on track. And while your grandpa may tell you to bust out the old USGS quadrant and a compass, we all know that isn’t happening anymore these days. Now we have multiple advanced mapping softwares to choose from to aid us in staying the course on our next adventure.
I’d encourage anyone who wants to get into the mountains to find a mapping software that they like, and get used to planning all your trips with it. Personally, I use Caltopo and would love to claim it as the greatest. But the truth is that it is really just the one I picked up early in my career and I haven’t had too much exposure to the others.
Map Reading
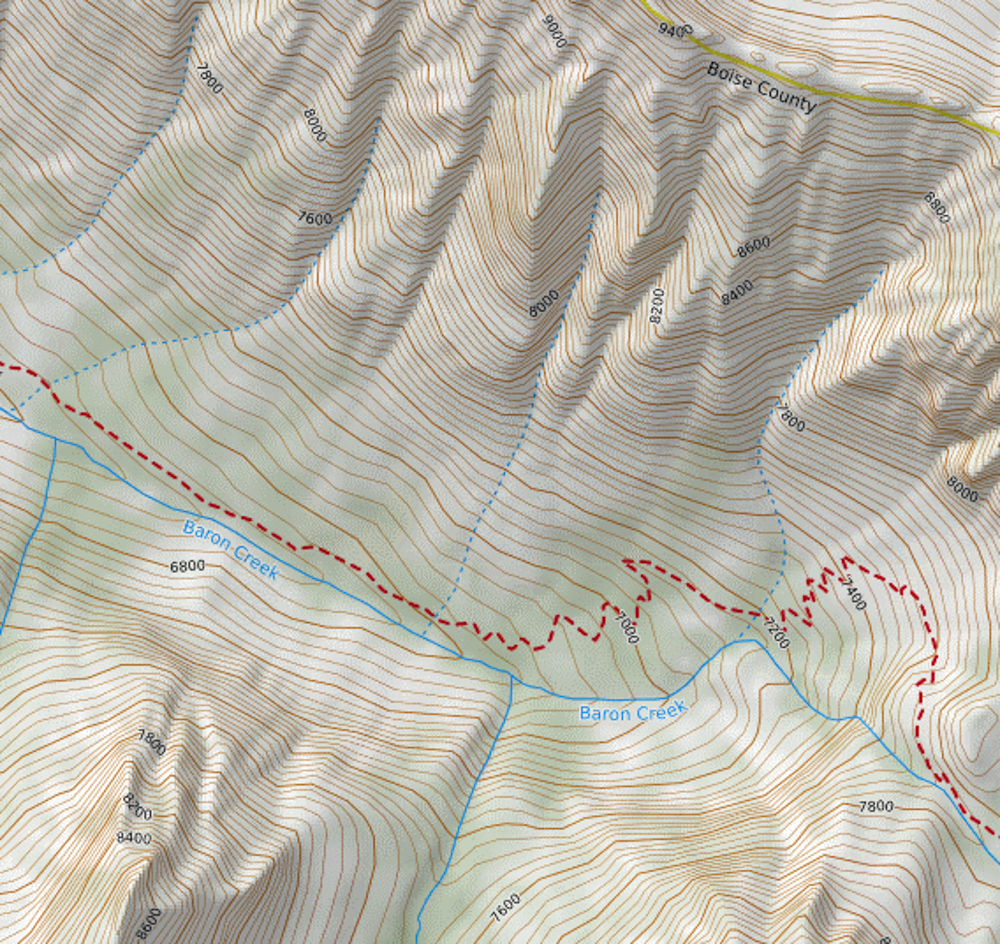
To start things off, we should probably do a quick recap of topographical mapping basics. Topographical maps use lines to help represent the 3D nature of terrain so that the viewer can better understand what kind of terrain they are looking at. Lines are spaced at elevation intervals of 40 feet, with bold lines every 200 feet. Tighter spacing of lines means steeper terrain, while more open spacing represents flatter terrain. In the picture below, you can see wider spacing along Baron creek and tighter spacing on the steep ridge above. As these lines curve and tighten they also highlight not just the angle of terrain, but also the shape of it. I had a geology professor once describe it as looking for the V’s on in the lines. As the line bends to a V shape, it either points uphill in elevation or downhill in elevation, notating either a gully or a ridge respectively. You can see this in the map below as the lines close into V shapes pointing uphill for Baron creek, and the steeper face to the North has numerous ridges with downward facing V’s. For most people this is pretty intuitive and programs like Caltopo also use some shading to help emphasize these features, so hopefully we can move on from map basics easily.
Lines
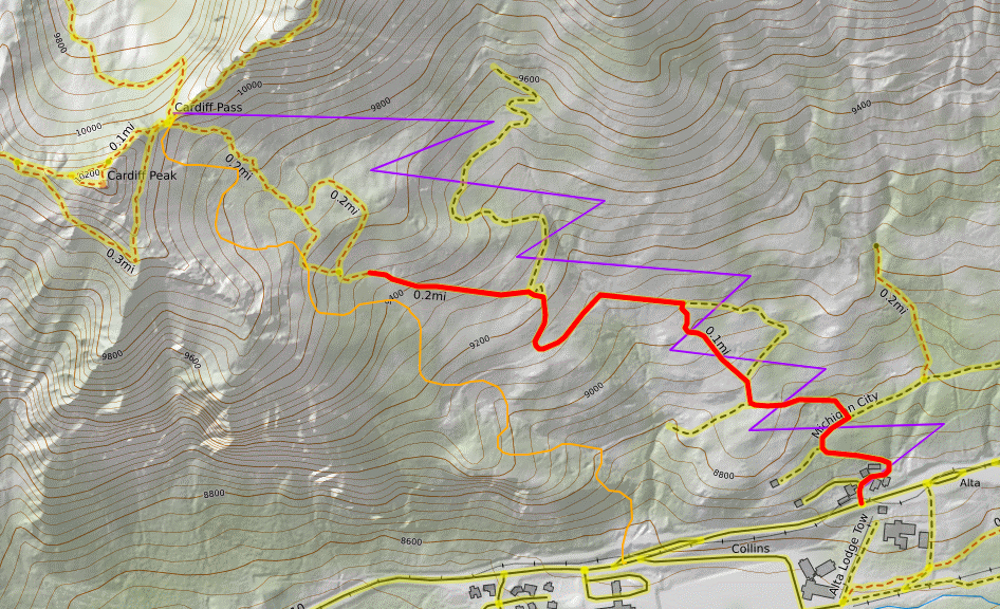
Now assuming we all know how to read maps, we can go on to creating our own routes on them. Sometimes “creating our own routes” really just means highlighting the pre-existing trails that the software has distinguished for the purpose of pulling the stats off of it, and sometimes it means adding lines over undeveloped meadows or glaciers with no trail to follow. Either way, Caltopo has three basic ways to add lines to your map. The first highlights developed trails that Caltopo has distinguished in their data, and can be seen by the red line in the photo below. Once you have selected “add line” developed trails in the view area will load in as yellow lines that can be selected for highlighting with your new line. The second line option is to just click anywhere on the map to add a new vertex to your line, represented by the purple line. Third, and least useful, is to hold down shift and freehand your own squiggly lines, as seen in the orange line. I have never really used this feature, but it could be fun if you want less straight lines on your map. With any of these options for drawing lines, pressing the escape key will remove the last vertex, essentially functioning as the “undo” feature.
Line Stats
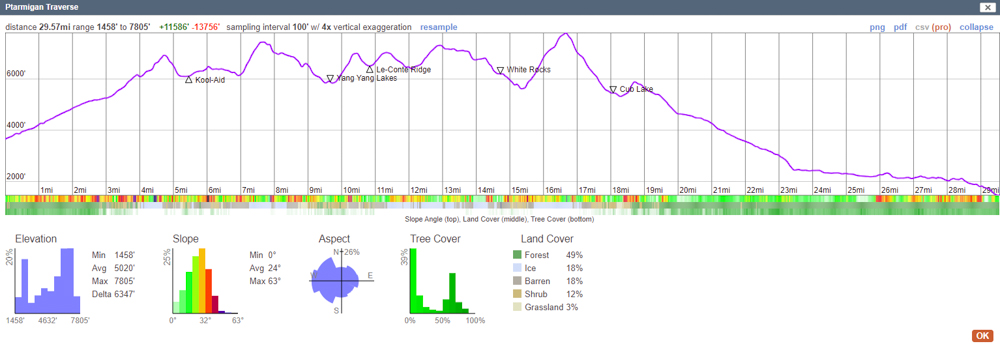
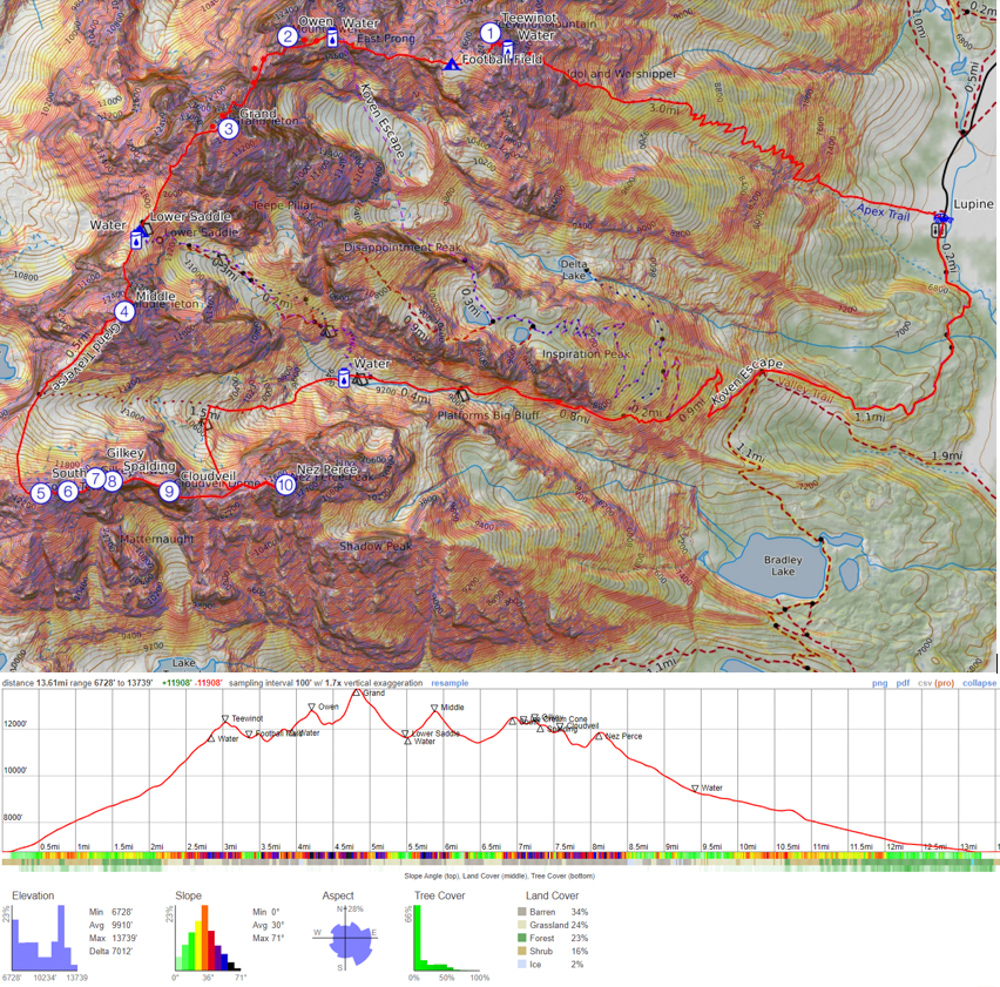
Once you have your line drawn you can select the “Terrain Stats” button to pull up all the info a mapping nerd could want. Distance, elevation change, and a route profile give you the quick and dirty on what your route will bring you. This will give you a good visual idea of what the distance and elevation changes will be like. I often bounce between the plan and profile views to help get a better understanding of where I will be going, and to add route markers to correlate between the two (for those who aren’t savvy with mapping lingo, “plan & profile” could be synonymous with “birds-eye & cross-cut”.) Terrain stats also include description of the land cover you will be traversing, which could be useful information in certain circumstances. In the winter I often refer to the slope stats and the aspect rose as parameters for avalanche terrain considerations.
Layers
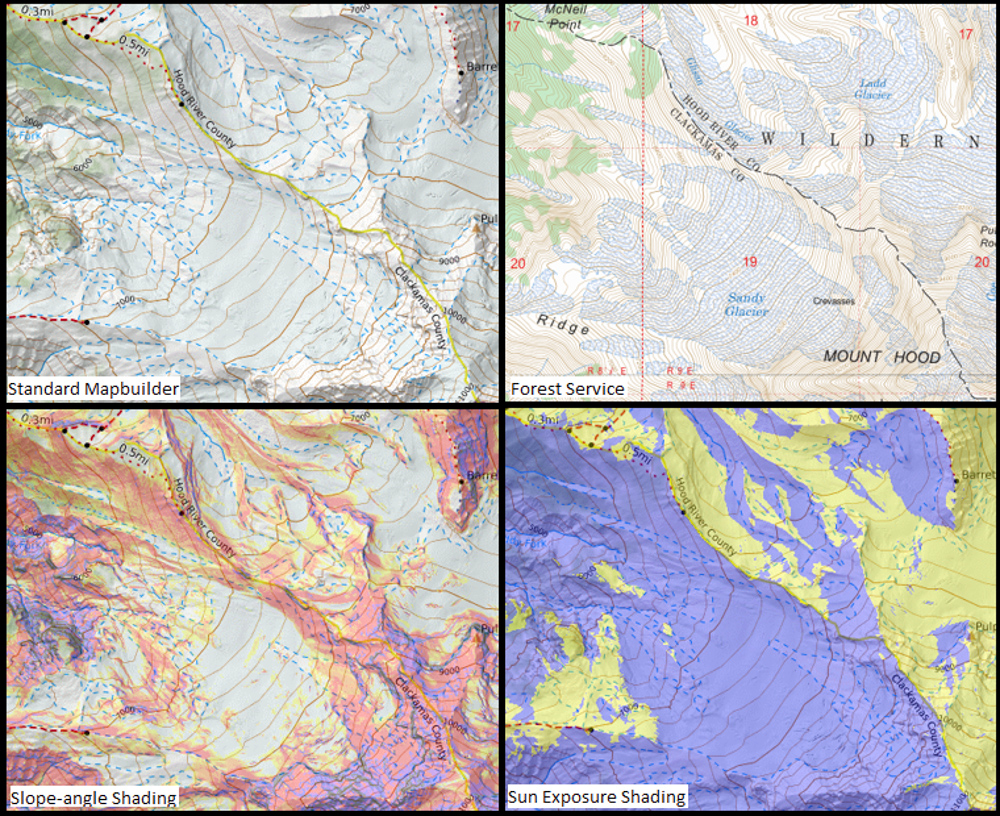
In addition to adding lines to our maps, you can also change the layers to get more information on the terrain. The below picture is of the same area, but with four different layers selected. The mapbuilder will be the standard view you access, although I almost always have the slope-angle shading turned on to better see the steepness of terrain I will be moving through. Switching to a forest service map can sometimes be helpful for determining the name of features such as glaciers or rivers. You can also use the sun exposure feature to check when your icey crux will be getting blasted with radiation, or where to get the best lighting for photographs. There are tons of layers to play with, and numerous other functions of the application that can help educate you on your terrain. If I am going deep into detective mode I may even switch to a satellite image layer to try and spot a rock ring that indicates a nice place to spend the night.
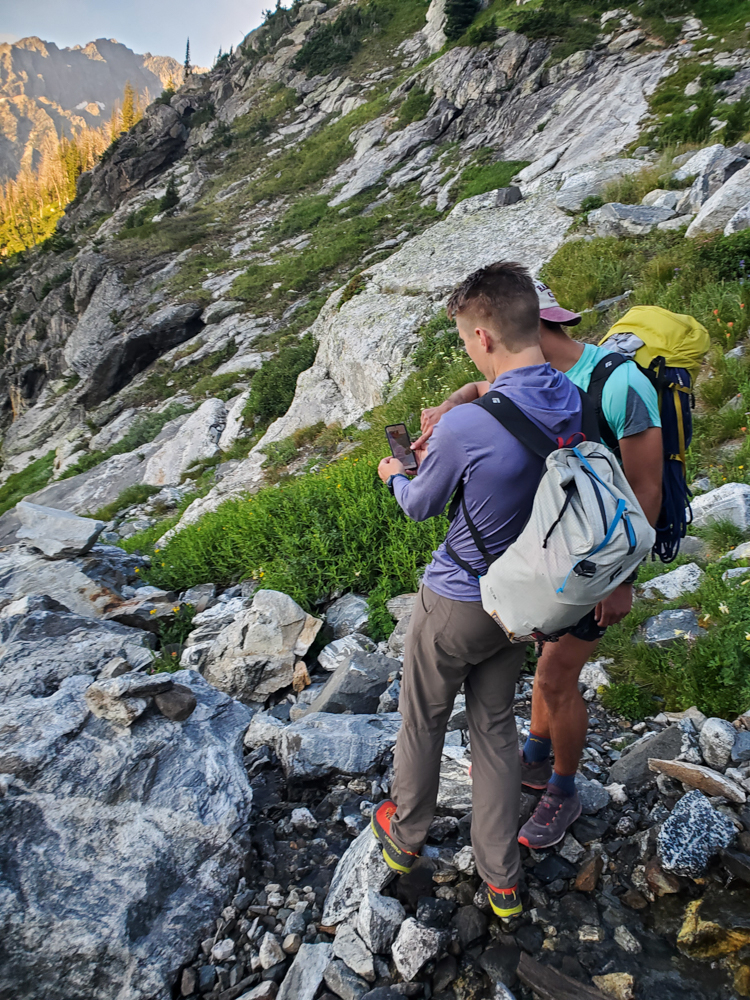
Use on the Go
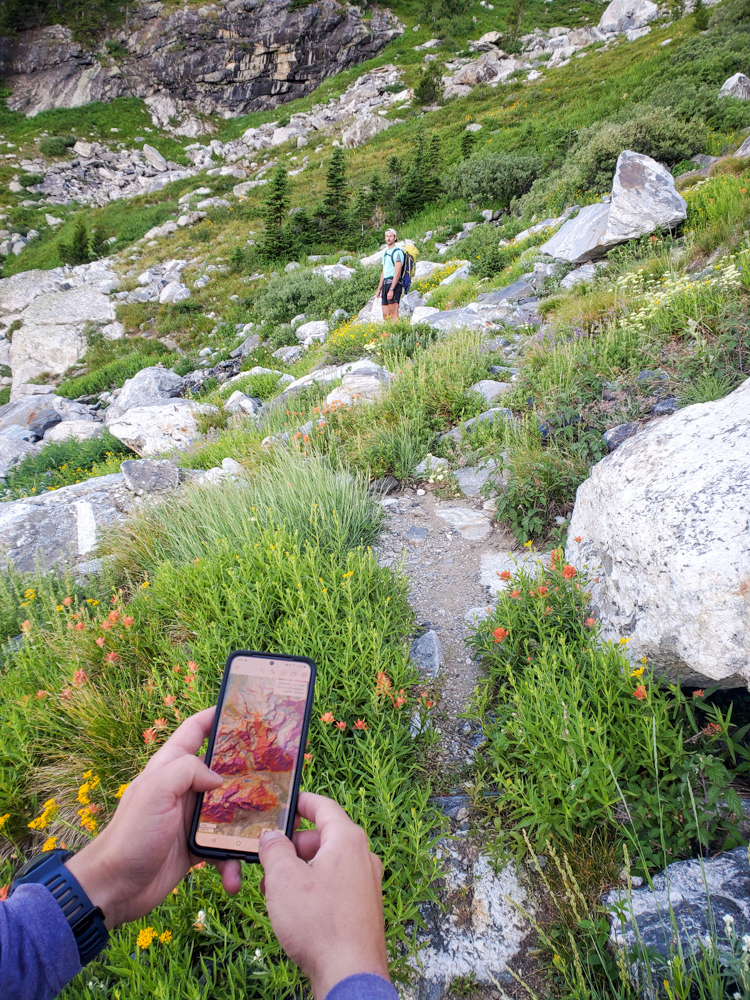
I am a huge advocate of drawing your maps out ahead of time, as this aids in route memorization and understanding much more than just downloading someone else’s GPX. However we may often want more than just our shaky recollection in our minds, and want something concrete in front of us as well. The whole reason you are mapping your area is because you likely won’t have an internet connection, and will need to access route information offline. Caltopo allows you to export map files in numerous forms, so you can upload it to your watch or inreach for easy offline route finding with their GPS functions. Caltopo also has a paid version of their mobile app, which allows you to download the maps you created so you can use your cell phone’s GPS along with its large screen to easily access the map. But maybe you are like me, too cheap to pay for an expensive watch with a massive LED display, or the seemingly insane couple of bucks for an app upgrade. Well Caltopo’s download function can be rudimentarily mimicked, ya darn cheapskate. When you check on your maps with internet service, the app cache’s the immediately loaded sections of the map, and retains this even while offline. This means you can still see the map you previously had open, although only limited sections or resolutions so don’t scroll or zoom too much. Either way, mapping a route yourself and then bringing along some version of it to jog your memory is a great way to stay the course while deep in the backcountry.
Researching Maps
All these tips are great, but how do I know which way to go? Where does one get the info to make your own map? Sometimes you might just need to use the map’s layers to read the terrain, and determine the best way to travel through for yourself. A great example of this is using the slope-angle shading layer to determine how to best travel through avalanche terrain where safe travel conditions can change week to week, and your buddy’s line from last month might not be the best way to go. But for a lot of mapping, and for at least many of the broad strokes of the route, you will use outside information a lot to determine where you want to go. There are numerous places to gather this information. You could refer to written directions from guidebooks or Mountain Project, and try to translate those into a line on the map. Or maybe you did find a Strava or Peakbagger GPX from some prior party’s excursion. Caltopo has an upload function so that you can bring mapping files from other software over into Caltopo itself. You can also share or print Caltopo maps themselves, a function I use often to update my partners on the planned route.
The Final Word
When all is said and done, after all the research and lines are drawn, you should have a flushed out map that you can share with partners and reference on the trail. But more importantly the more time you spend pouring over your map, the better your mental picture of the terrain will be. I often research and map routes that I hope to do one day, and on several occasions have been able to use simply my memory of those routes to pivot plans at the last minute as conditions or demands change. Most of the software out there has similar features, but regardless of which one seems most appealing, I highly suggest getting used to one and using it often to plan your trips into the backcountry.
About the Gear Tester

Evan Watts
Evan grew up in the small hometown of Boring, Oregon, where he cut his teeth hiking and backpacking in the local Cascades. He now enjoys ice climbing, backcountry skiing, and trail running around in the Western States, and manages to fight off permanent employment despite an environmental engineering degree and perturbed parents.
-
Evan Watts#molongui-disabled-link
-
Evan Watts#molongui-disabled-link

-
Evan Watts#molongui-disabled-link
-
Evan Watts#molongui-disabled-link